
Have you heard the term Polymer Clay but are unsure what it is, why some people use terms like Fimo and Premo and what can you actually make from it? Polymer Clay is a generic term for clay you bake to make it hard. Within this there are various different brands of clay like Fimo, Premo […]
Add To CartWhat is Polymer Clay and how do you make jewellery from it?
00Have you heard the term Polymer Clay but are unsure what it is, why some people use terms like Fimo and Premo and what can you actually make from it? Polymer Clay is a generic term for clay you bake to make it hard. Within this there are various different brands of clay like Fimo, Premo and Kato. All are slightly different and bake for slightly different times or at different temperatures but all essentially do the same thing and are great for making really unique jewellery. The first thing to do, and one of the most difficult for me, is to make a decision as to what colour clay to use. I seem to be naturally drawn to purple at the moment but wanted to make myself try something different colour wise. Eventually I choose and used half a block of white and a third of a block of red and a third of pink. You will see later on this quantity allowed me to make several pendants and still have quite a lot left over. Having chosen the clay the next step is to condition it. Initially the clay is too crumbly to use and conditioning makes it soft and pliable. Condition it using a roller or a pasta machine until you can fold it without it crumbling. Once it is conditioned you are ready to start being creative. There are so many options here but I have followed the steps we take on our Polymer Clay course to make Pendants. To make our pendants we use a base of clay and then cover this with slices from a Polymer Clay Cane. Canes are like sticks of rock. They are long and thin and have a pattern that goes all the way through them. To make my pendants I started by making a basic Bulls Eye Cane and a Jelly Roll Cane. The Bulls Eye Cane is a sausage of clay with a thinner sheet of clay wrapping it. You can vary the cane by adding additional wrappings and varying the thickness of them. The Jellyroll is two sheets of clay, one on top of the other, that are rolled together. I then cut this in various ways to make a Tile Cane. For the next cane I used a Skinner Blend. The skinner Blend blends two or three colours together to get a thin piece of clay...
Have you heard the term Polymer Clay but are unsure what it is, why some people use terms like Fimo and Premo and what can you actually make from it?
 Polymer Clay is a generic term for clay you bake to make it hard. Within this there are various different brands of clay like Fimo, Premo and Kato. All are slightly different and bake for slightly different times or at different temperatures but all essentially do the same thing and are great for making really unique jewellery.
The first thing to do, and one of the most difficult for me, is to make a decision as to what colour clay to use. I seem to be naturally drawn to purple at the moment but wanted to make myself try something different colour wise. Eventually I choose and used half a block of white and a third of a block of red and a  third of pink. You will see later on this quantity allowed me to make several pendants and still have quite a lot left over.
Having chosen the clay the next step is to condition it. Initially the clay is too crumbly to use and conditioning makes it soft and pliable. Condition it using a roller or a pasta machine until you can fold it without it crumbling. Once it is conditioned you are ready to start being creative. There are so many options here but I have followed the steps we take on our Polymer Clay course to make Pendants.
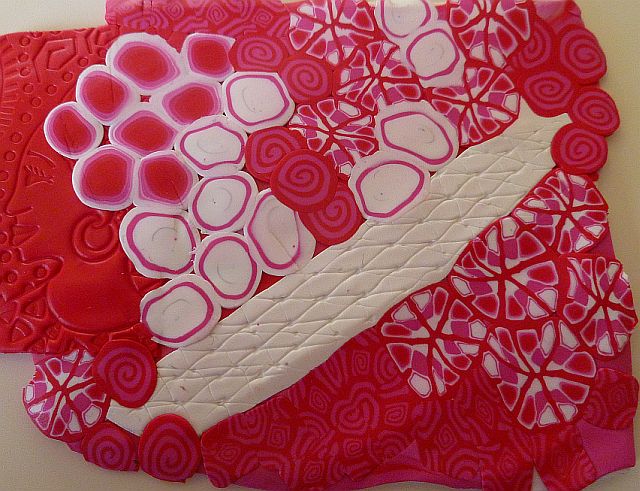
To make our pendants we use a base of clay and then cover this with slices from a Polymer Clay Cane. Canes are like sticks of rock. They are long and thin and have a pattern that goes all the way through them. To make my pendants I started by making a basic Bulls Eye Cane and a Jelly Roll Cane.
 The Bulls Eye Cane is a sausage of clay with a thinner sheet of clay wrapping it. You can vary the cane by adding additional wrappings and varying the thickness of them.
The Jellyroll is two sheets of clay, one on top of the other, that are rolled together. I then cut this in various ways to make a Tile Cane.
For the next cane I used a Skinner Blend. The skinner Blend blends two or three colours together to get a thin piece of clay with the original colours graduated through it. I rolled this out and wrapped white clay around it to finish it.
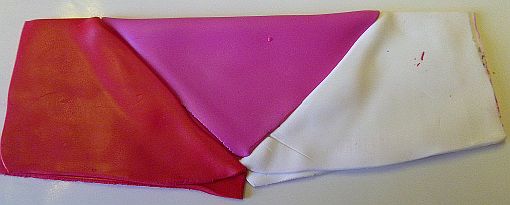
Next my favourite cane the Kaleidoscope. You never know how this one will turn out. It is a surprise every time. Take a rectangle of one colour as a base and put pieces of your other canes on it together with some of your scrapes. Wrap the base around it and use your hands to mould it into a triangle shaped cane. By cutting the cane into six pieces and moulding these together you get your Kaleidoscope Cane.
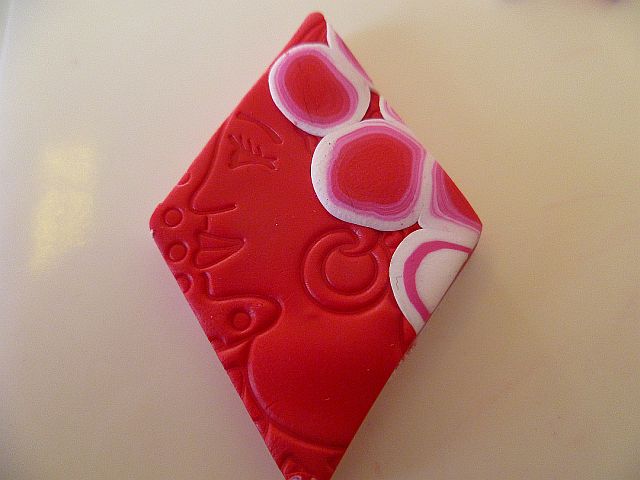
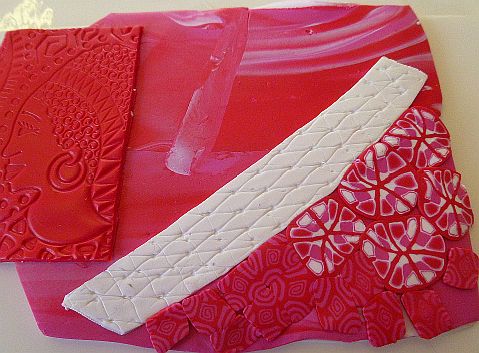
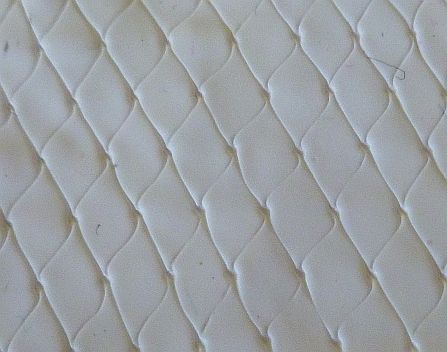
 Finally to finish the pieces to make my pendants from I textured two pieces of clay. For one I used a net bag normally used to wrap fruit in and for the other I used a specially made sheet for texturing clay.
Now it was time to make the pendants. Using the remaining white clay as a base I built this up using my scrap clay until I had a rectangle about 2mm thick with the white clay on the base. Next I cut some pieces from the textured clay and laid them onto the base. Then after cutting slices from the canes I laid these onto the base until it was almost covered.
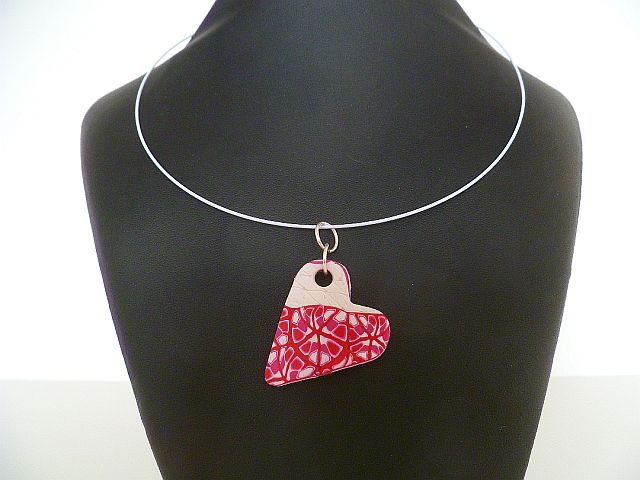
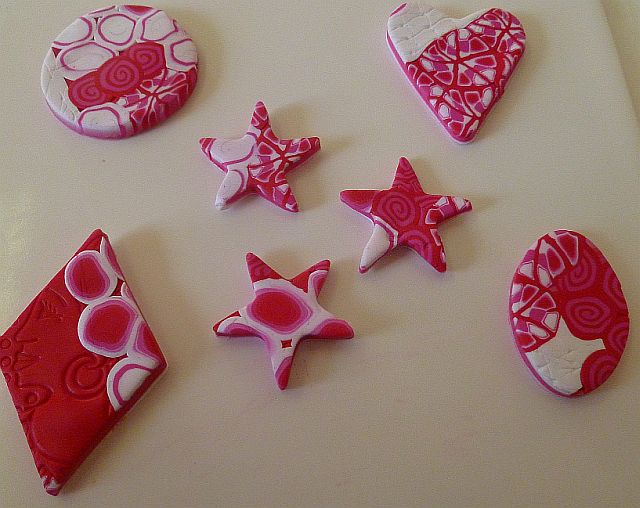
Using cutters I cut shapes out to make pendants. The last step, before baking, is to make holes in them to attach the findings to make jewellery. This was done with either a small cutter or a cocktail stick.

Finally the clay went into the oven for baking. I used Fimo Soft and baked the pieces for 30 mins at 120.
Once cooled I attached jump rings and put them onto some memory wire necklaces and the jewellery was ready to wear!


For details of Polmer Clay Courses at Crafts Bee click here.
Related Products
Artists Open House and Craft Fair
Artists Open House and Craft Fair
00Why not do some of your Christmas shopping at the Artists Open House and Craft Fair on Sunday 2 December in SE6? Don’t forget to check out the jewellery made by Angelheart Jewellery otherwise known as Liz one of our jewelley...
Using Up Your Scrap Polymer Clay.
Using Up Your Scrap Polymer Clay.
00Polymer Clay always goes further than you think it wil. Whatever you make you always have some left over. What do you do with yours? Try this as a great way of using some of it up and making a pendant. Collect the scraps together and form into a rectangle. Twist the rectangle a few times to help mix the colours together. Slice through the rectangle. The Pattern inside is revealed. Then cut out your pendant with a cutter or form a shape from the clay with your hands. Bake your clay and your pendant is ready! The Finished Piece For more information on Polymer Clay Classes at Crafts Bee click...
Learn to Make a Beaded Wire Cuff – Fun to make and great for Christmas Presents.
Learn to Make a Beaded Wire Cuff – Fun to make and great for Christmas Presents.
00We are making these lovely beaded wire cuffs on Thursday 18 October. A great class for everyone whether you are new to jewellery making or have some previous experience. Once you have learnt the basics start experimenting with different colours and thickness of wires and beads. Vary the pattern to make different widths of cuff or extend it to make a collar or necklace. I know it still seems too early to think about Christmas but these Beaded Wire Cuffs also make great, original and inexpensive Christmas presents. The class is from 9.30am to 12.30pm and you will make and take away a cuff, and the instructions to make more. All wire and beads are included in the price. For further details and booking click here ...
Felting Courses added to the website!
Felting Courses added to the website!
00Felting is one of the latest cool, creative crafts. Forget boring commercially produced felt. Make your own. It softer and thicker than the felt you buy and you can use it to make purses, bags, hats, slippers, scarves, bunting and jewellery. The only limit is your imagination! We have put together two exciting felting classes and these are now live on the website. Choose from making felt jewellery or learn how to make a piece of felt and turn it into a purse. We are pleased to welcome Abby, otherwise know as the Habedashery Hostess, to Crafts Bee. Abby will be busy teaching us all to felt. Courses are available on the 11 October with a date in November to be added soon. ...
Trusted Provider by Hotcourses!

 We are delighted to have been awarded Trusted Provider status by Hotcourses. They tell us they have only awarded this to 50 providers out of the hundreds they deal with so it is a real honour!
