What did we transform this into?
What did we transform this into?
00Take a piece of 1980’s reproduction furniture. Well built and with years of life left in it but outdated. Use a few simple steps to transform it. First we removed the doors and filled and sanded the holes left by the hinges. Then we glued some mouldings to the cupboard door and took off the drawer handles. Next we used some sugar soap to clean it and remove an old dirt or grease. Then, to cover up the dark wood, we gave it three coats of chalk paint. Cream on the outside and red on the inside. Gold leaf was applied to the mouldings and drawer handles and the drawer handles were reattached. The paint was protected by applying a layer of wax and dark wax was applied to the red paint only to darken it. No sanding and minimal preparation and the piece was finished. To find out more about chalk paint click here....
Hiding Ugly Wiring
Hiding Ugly Wiring
00Wiring, extension leads and plugs. We can’t do without them but they don’t look good. Use our simple method of covering a box in fabric and transform this Into this Here is how we did it. Double click on any of the photos for a better, bigger view of them. Collect together the materials you will need. These are a box with lid to cover, fabric, scissors to cut the fabric and a glue gun or other glue. If you don’t have a sewing machine or overlocker choose a fabric that does not fray. Your will also need a hacksaw or strong scissors and a tape measure. Choose a box that has handles in the side for holding it and use the hacksaw or strong scissors to cut a channel from the top of the box to the handle. The channel is so you can pass the wires from the top through to the handle. You now need to take some measurements. Measure the width of the lid. Include the length of the edge of the lid at both sides. Click on the photo to enlarge it and see where the tape measure is. This is measurement A. Measure across the length of the lid and again include length of the edge on both sides. This is measurement B. Turn the lid over and measure the inside of the edge. This is Measurement C. Cut out the fabric for your lid. The width will be A+C+C. The length will be B+C+C. This will give you a piece of fabric big enough to completely cover the outside of the lid plus the lip on the inside. Measure around the whole width of the box. If your box, like mine, is wider around the top than the bottom, measure around the widest part. This is measurement D. Measure the height of the box. This is measurement E. Cut out your fabric for the box. The length will be D plus 5cm. The height will be E plus 9cm. If you have a sewing machine or overlocker either zigzag or overlock the edges of both pieces to stop them fraying. If you don’t have access to a sewing machine pick a fabric that does not...
Free Craft Workshops at the Country Living Spring Fair!
Free Craft Workshops at the Country Living Spring Fair!
00The Country Living Magazine Spring Fair is offering free craft workshops and lots more! The Fair takes place from 18-22nd March in the Business Design Centre, London and is the perfect way to start the new season and get inspired with lots of ideas for your home and garden with an array of carefully selected exhibitors, from small producers to craftspeople from across the British Isles. Alongside a unique shopping experience, you’ll be able to see the pages of the magazine come to life in a range of seasonal features. From lively talks and hands on workshops, to lamb feeding and a beautiful Spring Garden with experts on hand to give you advice, this year’s Spring Fair promises to be a wonderful celebration of the season. Craft Workshops: Get the chance to get interactive with the ‘Craft and Create Rooms’. The classes involve everything from needle felting fairy tales, kite wall decorations, block printing a tea towel to patchwork, quilting and textiles. Learn from the experts, such as Hilary Jane, Ellen Clarke and Sarah Peel, who are just a few examples of our range of tutors for the classes. These sessions from talented craftspeople will bring out your imaginative side and leads you to taking your final creation home with you. To book your ticket in advance click here and quote discount code S15C03 at the online checkout to get £1 off standard ticket price. Garden Feature and Theatre: See the garden masterpiece created by Lucy Summers, this glorious display of explosion of colour from beautiful spring florals with give you inspiration for your own garden, as well as show you how to plant flowers and edible produce including tomatoes, aubergines and beans. Green and Black’s Taste Experience: Try up to 20 unique flavoursome organic products, also hear the In-house celebrities reveal how Green and Black’s is not just a chocolate bar. Spring Bunting Competition: Fancy a challenge? The winning entry will receive £100 and the runner up will receive a pair of complimentary tickets for the 2015 Christmas Fair. Gala Evening: Perfect if you’re looking for the relaxed shopping experience. Gala Evening will be on Thursday 19th March and will be serving complimentary wine, so it’s a perfect end to the working day....
 00
00
Understitching
Understitching
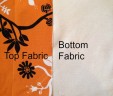
00Understitching Understitching is a technique used to get a facing to lie flat. It is important technique to understand to help you get a good finish when making clothes. To finish off a neckline or armhole you need to add a facing. If you do not understitch you will have trouble getting the facing to lie flat and parts of it will show on the right side of the garment. Below we explain how to understitch. When you are applying it to a neck or arm facing it is exactly the same technique but you may need to clip or notch the seam to help them lie flat. Take two pieces of fabric. One piece will be the top fabric and the other, when finished will be the bottom piece, or the facing if making a garment. Sew the two pieces of fabric together. If you now place the bottom fabric behind the top fabric you can see that it does not lie flat and you can see the bottom fabric. Turn the fabric over and use your fingers or an iron to press the seam towards the bottom fabric. Turn the fabric back to the right side and sew a line of stitches, on the bottom fabric, as close as possible to the seam. Because you have pressed the seam allowance towards the bottom fabric your line of stitching will be though the bottom fabric and the seam allowance. Turn the bottom fabric behind the top fabric and press the seam. The bottom fabric will now lie flat behind the top fabric. The back view showing a neat, flat...
 00
00
What is Pattern Cutting?
What is Pattern Cutting?
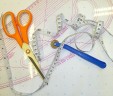
00What is Pattern Cutting Have you tried dressmaking and are wondering what to try next? Then pattern cutting may be your next step. Pattern cutting is making a basic pattern, to your specific measurements, that you can adapt to make different styles or trousers, skirts or bodices. Because they are based on your own measurements the fit will be much better than with a commercial pattern that you buy. Here are some of the questions we are often asked about pattern cutting. How much experience do I need before I try pattern cutting? This depends on what type of pattern you want to cut but starting with a simple A line or straight skirt requires very little previous experience. Feeling confident using a sewing machine is all you need but previous experience of making a skirt will help. Trousers are slightly more complicated. An understanding of how the pattern pieces fit together helps but is not essential. Bodice patterns are best left till you are a competent dressmaker with an understanding of dart manipulation. Where sort of pattern do I start with? This will depend on how much experience of dressmaking you have and how confident you feel but we would suggest start with skirts or trousers. Once you have your basic skirt pattern is a simple process to alter the edge of the pattern outwards to create an A line or flared skirt or move it inwards to make a straight skirt. The choice is yours. The pattern for trousers is slightly more complicated but still very achievable. Like skirts the basic pattern can be easily altered for a straight cut, bootleg, flared or shorts to name a few. What is the actual process of pattern cutting? The first step is to take your measurements. The more accurate you are with these the better the fit you will get. Using a large piece of pattern paper you then start to draw your pattern. You follow a set of instructions which will guide you step by step in how to do this. This pattern is known as a “Block” which is a template that is personal to you. You can adjust your block to make the style you want. Use your block to make a “toile”. This means is a garment made up in cheap material so that the design can be tested and perfected. After you have made...
Trusted Provider by Hotcourses!

 We are delighted to have been awarded Trusted Provider status by Hotcourses. They tell us they have only awarded this to 50 providers out of the hundreds they deal with so it is a real honour!
